#Day8 of Mastering JavaScript Fundamentals: The Complete Guide to JavaScript30
Fun with Canvas


Fun with Canvas
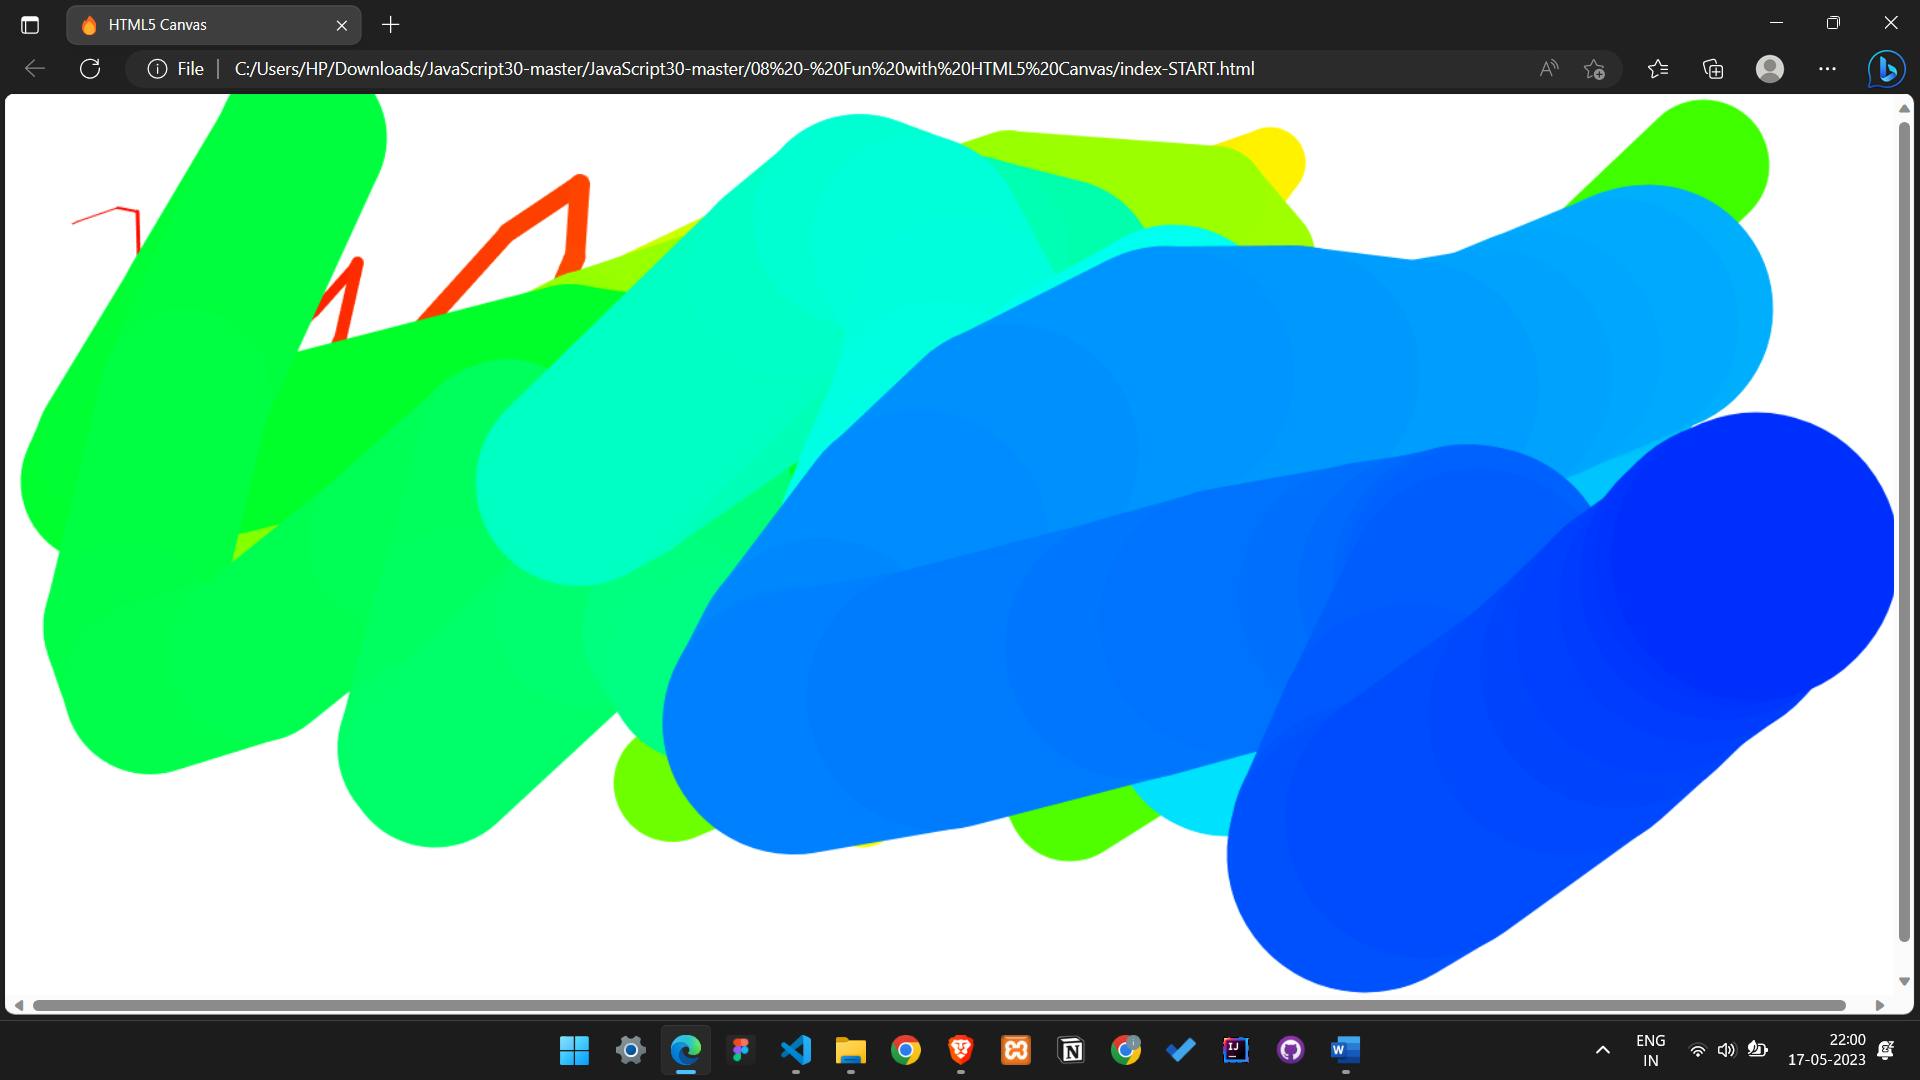
In Day 8 of the JavaScript30 course by Wes Bos, the focus is on the "Fun with HTML Canvas" project. This project explores the capabilities of the HTML <canvas> element and provides a hands-on opportunity to create interactive drawings and animations using JavaScript.
The key concepts covered in this project include working with the <canvas> element, accessing the drawing context, understanding coordinate systems, and using various drawing methods and properties provided by the canvas API.
Learn how to set up the canvas element, retrieve the drawing context, and manipulate properties such as stroke style, line width, and global composite operations. Also, learn how to handle mouse events to create interactive drawing experiences.
By the end of the project, you will have a solid understanding of how to leverage the HTML <canvas> element and the canvas API to create dynamic and visually appealing drawings and animations on the web.
Key Concepts Used in this Project
The "Fun with HTML Canvas" project introduces several key concepts related to working with the <canvas> element and JavaScript graphics programming. Here are the key concepts covered in this project:
<canvas>element:The project demonstrates how to create and manipulate the
<canvas>element, which provides a drawing surface for graphics.Canvas context:
Participants learn how to access the drawing context of the
<canvas>element using the getContext() method. The context provides methods and properties for drawing on the canvas.Coordinate system:
The project covers the coordinate system used in the canvas, where the top-left corner is the origin (0, 0), and the x and y coordinates increase as you move right and down, respectively.
Drawing methods:
Various drawing methods, such as stroke(), fill(), beginPath(), moveTo(), lineTo(), and arc(), are explored. These methods allow participants to create shapes, lines, curves, and arcs on the canvas.
Styling and colors:
Participants learn how to set stroke and fill styles using strokeStyle and fillStyle properties. They also explore transparency and composite operations using globalAlpha and globalCompositeOperation properties.
Animation:
The project introduces animation techniques by using the requestAnimationFrame() method to create smooth and interactive animations.
Mouse events:
Participants learn how to handle mouse events, such as mousemove and mousedown, to create interactive experiences, such as drawing based on user input.
By understanding and applying these key concepts, participants can create dynamic and visually engaging drawings, animations, and interactive experiences using the HTML <canvas> element and JavaScript graphics programming techniques.
Detailed Explanation of every concept
Here's a detailed explanation of each concept with its corresponding code snippet:
<canvas>element:The
<canvas>element is an HTML tag that provides a drawing surface for graphics. To create a canvas element, use the following HTML markup:<canvas id="myCanvas"></canvas>Canvas context:
The canvas context provides methods and properties for drawing on the canvas. To obtain the context, use the getContext() method:
 const canvas = document.querySelector('#myCanvas');
 const context = canvas.getContext('2d');
Coordinate system:
The canvas has a coordinate system where the top-left corner is the origin (0, 0). The x and y coordinates increase as you move right and down, respectively.
Drawing methods:
stroke():This method outlines the path or shapes with the current stroke style.
fill():This method fills the path or shape with the current fill style.
beginPath():This method begins a new path.
moveTo(x, y):This method moves the pen to the specified coordinates without drawing a line.
lineTo(x, y):This method draws a line from the current pen position to the specified coordinates.
arc(x, y, radius, startAngle, endAngle, anticlockwise):This method draws an arc with the specified parameters.
Styling and colors:
strokeStyle:This property sets the stroke color or style.
fillStyle:This property sets the fill color or style.
globalAlpha:This property sets the transparency value for drawings.
globalCompositeOperation:This property sets the type of composite operation to apply to drawings.
Animation:
Animation can be achieved using the
requestAnimationFrame()method, which calls a specified function before the next repaint. It allows for smooth and efficient animations. Here's an example of usingrequestAnimationFrame():function animate() { // Animation logic here requestAnimationFrame(animate); } // Start the animation animate();Mouse events:
Mouse events can be used to create interactive experiences on the canvas. For example, you can use the
mousemoveevent to track the mouse position and draw based on user input. Here's an example:canvas.addEventListener('mousemove', draw); function draw(event) { // Get the mouse position const x = event.clientX; const y = event.clientY; // Draw something based on the mouse position // ... // Example: Draw a line from the previous position to the current position context.lineTo(x, y); context.stroke(); }
By understanding and implementing these concepts, you can create dynamic and visually appealing graphics, animations, and interactive experiences using the HTML <canvas> element and JavaScript.
Code Snippets
To teach you how to make the "Fun with HTML Canvas" project, I'll provide a step-by-step guide along with code snippets. Here's a breakdown of the process:
Set up the HTML structure: Create an HTML file and add a
<canvas>element with a unique ID to the body:<canvas id="draw"></canvas>Obtain the canvas context: In JavaScript, get a reference to the canvas element and obtain the 2D drawing context:
 const canvas = document.querySelector('#draw');
 const ctx = canvas.getContext('2d');
Set up the canvas size: Make the canvas cover the entire window by setting its width and height to match the window's inner width and height:
 canvas.width = window.innerWidth;
 canvas.height = window.innerHeight;
Set initial drawing properties: Configure the drawing properties such as stroke style, line width, and line join:
 ctx.strokeStyle = '#BADA55';
 ctx.lineWidth = 10;
 ctx.lineJoin = 'round';
 ctx.lineCap = 'round';
Add event listeners for drawing: Attach event listeners to track the mouse movements and perform drawing actions:
 let isDrawing = false;
 let lastX = 0;
 let lastY = 0;

 canvas.addEventListener('mousedown', (e) => {
   isDrawing = true;
   [lastX, lastY] = [e.clientX, e.clientY];
 });

 canvas.addEventListener('mousemove', draw);
 canvas.addEventListener('mouseup', () => isDrawing = false);
 canvas.addEventListener('mouseout', () => isDrawing = false);
Implement the drawing logic: Create a
drawfunction that will be called on mouse move and perform the drawing actions:function draw(e) { if (!isDrawing) return; ctx.beginPath(); ctx.moveTo(lastX, lastY); ctx.lineTo(e.clientX, e.clientY); ctx.stroke(); [lastX, lastY] = [e.clientX, e.clientY]; }Customize additional features: Feel free to customize the project by experimenting with different colors, line widths, blending modes, and adding additional functionality such as clear canvas or rainbow drawing.
By following these steps and understanding the code snippets provided, you'll be able to create the "Fun with HTML Canvas" project. Feel free to explore and experiment with different drawing techniques and styles to make the project your own.
Summary
"Fun with HTML Canvas" is a project from Day 8 of the JavaScript30 course by Wes Bos. In this project, participants learn how to leverage the HTML <canvas> element and JavaScript to create interactive drawings and animations.
The key concepts covered in this project include working with the <canvas> element, accessing the drawing context, understanding the coordinate system, utilizing various drawing methods and properties, handling mouse events, and implementing animation.
By following a step-by-step guide, you can set up the canvas, configure drawing properties, attach event listeners for drawing actions, and implement the drawing logic using methods like stroke(), fill(), beginPath(), moveTo(), and lineTo(). They also explore styling and colors, animation using requestAnimationFrame(), and interactive experiences with mouse events.
By mastering these concepts, participants gain the ability to create visually appealing drawings, animations, and interactive experiences using the HTML <canvas> element and JavaScript graphics programming.
Through practical coding exercises and provided code snippets, participants develop hands-on experience and confidence in working with the <canvas> element and creating engaging graphics using JavaScript.
Other Reads
This blog provides a brief overview of the topics covered in the JavaScript30 course. For those looking for a quick review or to brush up on their JavaScript skills, this blog is a great resource. However, for a more comprehensive understanding of the topics covered, I highly recommend checking out the JavaScript30 course.
The JavaScript30 course covers a wide range of practical JavaScript projects that will help you build your skills and understanding of the language. The course is designed for anyone with a basic understanding of JavaScript and covers topics such as working with the DOM, manipulating CSS with JavaScript, making AJAX requests, and using ES6 features.
Overall, the JavaScript30 course is an excellent resource for anyone looking to improve their JavaScript skills and build practical projects. By following along with the course, you'll gain a solid understanding of the language and be able to apply your skills to real-world projects.
Reference
Other javascript30 Blogs to follow along